Receiving Email with Python, Django and Flask
It's possible to receive email with CloudMailin using Python and the Django or Flask frameworks. This guide will walk you through the steps required to receive email with Python.
You can jump straight to the section that's relevant to you:
Receive email with Flask
To work with Flash it's best to use the JSON (Normalized) version of our HTTP POST.
Assuming that python and pip are installed on your system you can install Flask using:
pip install flask
Flask can automatically parse the JSON email sent via HTTP POST into a dictionary that we can make use of:
from flask import Flask, request, jsonify

app = Flask(__name__)

@app.route('/incoming_mails', methods=['POST'])
def cloudmailin_webhook():
    # Get the JSON data from the POST request
    data = request.get_json()

    # Access specific fields from the JSON data
    subject = data.get('headers', {}).get('subject', 'No Subject')
    from_email = data.get('envelope', {}).get('from', 'No Sender')

    # Print the extracted fields to the console
    print(f"Subject: {subject}")
    print(f"From: {from_email}")

    return jsonify(status='ok')

if __name__ == "__main__":
    app.run(host='0.0.0.0', debug=True)
The Python script above receives the full email via Webhook and then simply prints the subject and sender to the console. You can run the script using:
FLASK_APP=app.py flask run
Testing Incoming Email Locally
There are a couple of options for receiving email via HTTP POST locally:
Webhook App
If you want to see how a format will look with your own content we recommend using the WebhookApp. Simply set the WebhookApp as your message url target and then send an email. The message content will then be sent over HTTP to the app using WebSockets so you can view this content and try out the format.
Postman
We also have some examples in Postman that you can use to start development before you send your own mail. The examples include an email message with all the expected attributes and an attachment.

HTTP status codes matter
With CloudMailin you can return an [HTTP status code] to indicate the status of your email processing. If you return a 2xx status code then CloudMailin will tell the sending server everything was successful. If you return a 4xx status code then the message will be bounced and a 5xx status code will tell the sender to try again later.
Let's make use of this and return a 4xx status code if the email isn't to the correct address:
For this example we'll use the To in the envelope. This is the address that the SMTP server receives. In some cases you may want to check the headers though.
from flask import Flask, request, jsonify
from http import HTTPStatus

app = Flask(__name__)

@app.route('/incoming_emails', methods=['POST'])
def cloudmailin_webhook():
    # Get the JSON data from the POST request
    data = request.get_json()

    # Access specific fields from the JSON data
    subject = data.get('headers', {}).get('subject', 'No Subject')
    to_email = data.get('envelope', {}).get('to', None)

    # Print the extracted fields to the console
    print(f"Subject: {subject}")
    print(f"To: {to_email}")

    if to_email != "postman@cloudmailin.net":
        return jsonify(error=f"invalid to address {to_email}"), HTTPStatus.UNPROCESSABLE_ENTITY

    return jsonify(status='ok', subject=f"Subject: {subject}")

if __name__ == "__main__":
    app.run(host='0.0.0.0', debug=True)
Protecting our email Webhook
We recommend that only CloudMailin is allowed to POST email to the endpoint that you expose. In order to do that we'll install Flask-HTTPAuth
pip install flask-httpauth
With Flask-HTTPAuth installed we can now protect our endpoint with a username and password. We use the verify_password function to check the username and password passed in the basic auth header.
from flask import Flask, request, jsonify
from http import HTTPStatus
from flask_httpauth import HTTPBasicAuth

app = Flask(__name__)
auth = HTTPBasicAuth()

@auth.verify_password
def verify_password(username, password):
    # Replace with your actual username and password
    if username == 'cloudmailin' and password == 'password':
        return True
    return False

@app.route('/incoming_emails', methods=['POST'])
@auth.login_required
def cloudmailin_webhook():
    # Get the JSON data from the POST request
    data = request.get_json()

    # Access specific fields from the JSON data
    subject = data.get('headers', {}).get('subject', 'No Subject')
    to_email = data.get('envelope', {}).get('to', None)

    # Print the extracted fields to the console
    print(f"Subject: {subject}")
    print(f"To: {to_email}")

    if to_email != "postman@cloudmailin.net":
        return jsonify(error=f"invalid to address {to_email}"), HTTPStatus.UNPROCESSABLE_ENTITY

    return jsonify(status='ok', subject=f"Subject: {subject}")

if __name__ == "__main__":
    app.run(host='0.0.0.0', debug=True)
With the username and password in place we need to make sure we send the user and password in the basic auth header in our test HTTP POST CloudMailin and when configuring CloudMailin.
Receiving Email Attachments with Flask
CloudMailin makes receiving email attachments easy. There are two options for attachments:
You can either
- receive the attachments as part of the JSON data that is POSTed; Or
- upload the attachments directly to Cloud Storage such as AWS S3 and receive them as a URL
We're not going to show a full example here but instead just link to the
relevant documentation
HTTP POST Formats - JSON Attachments.
As with the parameters above it's simply a matter of taking either the
attachments[0].url or attachments[0].content and working with them.
For example for the Attachment Storage version we could get the URL of the first attachment like so:
# Access specific fields from the JSON data
subject = data.get('headers', {}).get('subject', 'No Subject')

# Get the URL of the first attachment
attachments = data.get('attachments', [])
first_attachment_url = attachments[0]['url'] if attachments else None

# Print the extracted fields to the console
print(f"Subject: {subject}")
print(f"First attachment URL: {first_attachment_url}")
Great, that's all we need to do. Obviously this can be extended to perform additional processing and work with the email content.
Once you've deployed your application to a public server you'll just need to configure CloudMailin to send email to your endpoint.
Receive email with Django
It's really simple to receive email in Django using the JSON (Normalized)
version of our email to HTTP POST. First we'll setup the URL to receive the
email at /incoming_emails/
# cloudmailin_example/urls.py
from django.contrib import admin
from django.urls import path
from cloudmailin_example.views import cloudmailin_webhook

urlpatterns = [
    path('admin/', admin.site.urls),
    path('incoming_emails/', cloudmailin_webhook),
]
With the URL set we can add a simple view function to receive the email POSTed via HTTP:
# cloudmailin_example/views.py
from django.http import JsonResponse
from django.views.decorators.csrf import csrf_exempt
import json

@csrf_exempt
def cloudmailin_webhook(request):
    if request.method == 'POST':
        # Get the JSON data from the POST request
        data = json.loads(request.body)

        # Access specific fields from the JSON data
        subject = data.get('headers', {}).get('Subject', 'No Subject')
        from_email = data.get('envelope', {}).get('from', 'No Sender')

        # Print the extracted fields to the console
        print(f"Subject: {subject}")
        print(f"From: {from_email}")

        return JsonResponse({'status': 'ok'})
    else:
        return JsonResponse({'status': 'bad request'}, status=405)
Testing Incoming Email Locally
There are a couple of options for receiving email via HTTP POST locally:
Webhook App
If you want to see how a format will look with your own content we recommend using the WebhookApp. Simply set the WebhookApp as your message url target and then send an email. The message content will then be sent over HTTP to the app using WebSockets so you can view this content and try out the format.
Postman
We also have some examples in Postman that you can use to start development before you send your own mail. The examples include an email message with all the expected attributes and an attachment.
Validate the To address
More details about the HTTP POST format can be found in the [HTTP Post Formats], however as a simple example we'll validate that the email is sent to the correct address.
In this example we'll take the To address from the envelope. This is the address that the SMTP server receives. In some cases you may want to check the headers though.
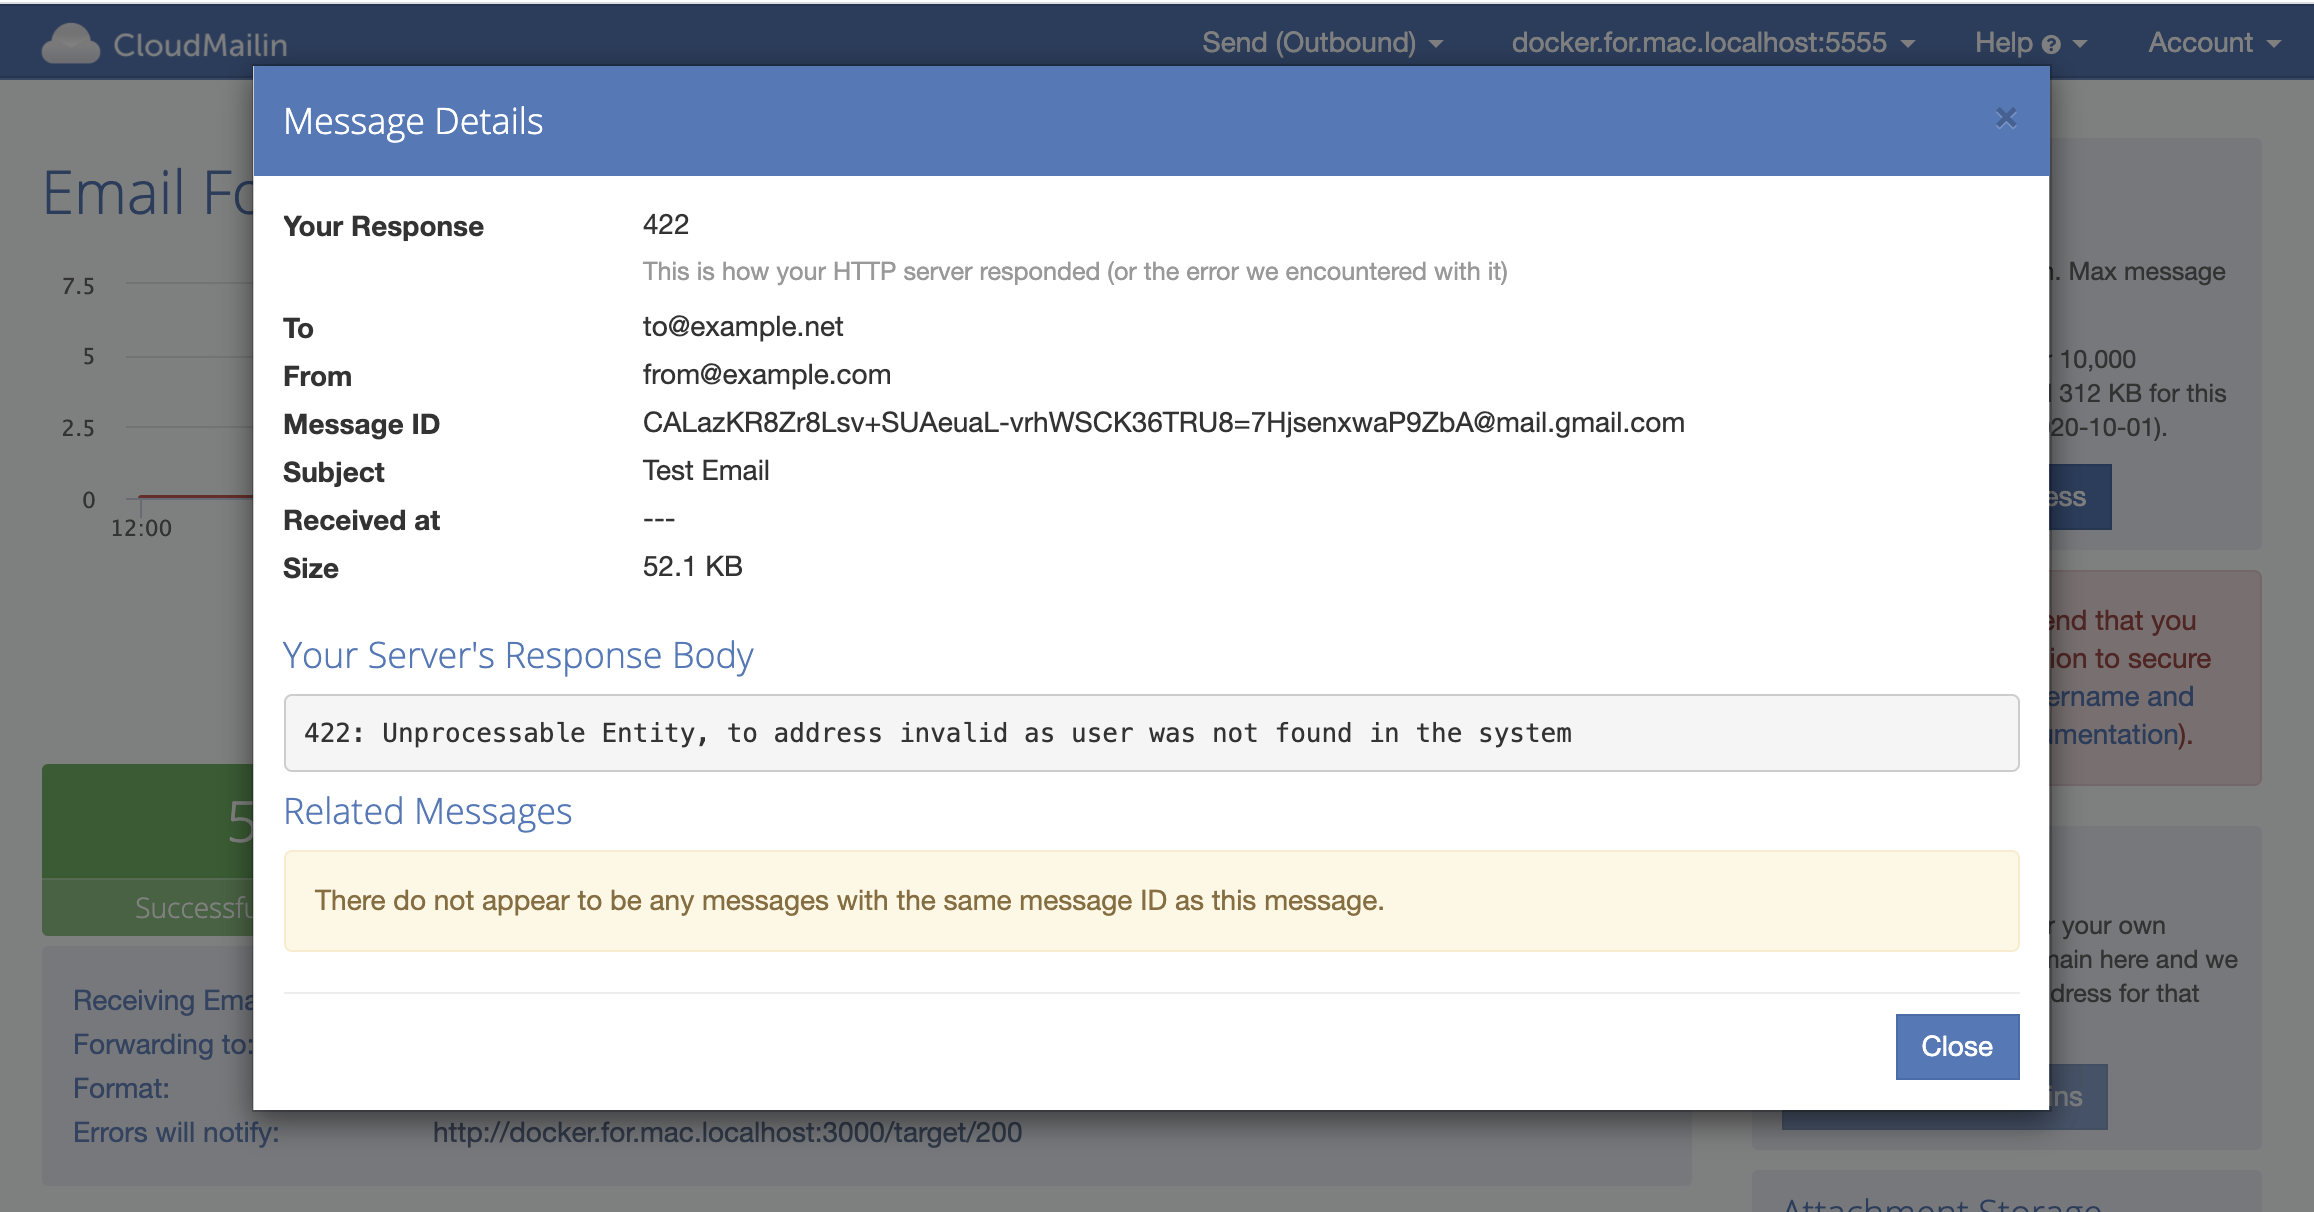
So lets check the to address and return a 422 status code if it's not the
address that we expect:
# cloudmailin_example/views.py
from django.http import JsonResponse
from django.views.decorators.csrf import csrf_exempt
from django.views.decorators.http import require_POST
from http import HTTPStatus
import json

@csrf_exempt
@require_POST
def cloudmailin_webhook(request):
    # Get the JSON data from the POST request
    data = json.loads(request.body)

    # Get the 'to' field from the 'envelope' dictionary
    to_email = data.get('envelope', {}).get('to')

    # Validate the 'to' address
    if to_email != 'postman@cloudmailin.net':
        return JsonResponse({'status': f"invalid to: {to_email}"},
                            status=HTTPStatus.UNPROCESSABLE_ENTITY)


    # Access specific fields from the JSON data
    subject = data.get('headers', {}).get('Subject', 'No Subject')

    # Print the extracted fields to the console
    print(f"Subject: {subject}")

    return JsonResponse({'status': 'ok'})
The code above makes use of the require_POST decorator to ensure that only
POST requests are allowed to the endpoint and to simplify the code. It also
returns a 422 status code if the to address is not the address that we
expect.
Protecting our email Webhook
We recommend that only CloudMailin is allowed to POST email to the endpoint that you expose. In order to do that we'll add a decorator to our webhook view. CloudMailin supports basic auth so we'll use that to protect our endpoint:
from django.http import JsonResponse
from django.views.decorators.csrf import csrf_exempt
from django.views.decorators.http import require_POST
from http import HTTPStatus
import json
import base64

def basic_auth_required(view_func):
    def _wrapped_view_func(request, *args, **kwargs):
        if 'HTTP_AUTHORIZATION' in request.META:
            auth_data = request.META['HTTP_AUTHORIZATION'].split()
            if len(auth_data) == 2:
                if auth_data[0].lower() == "basic":
                    username, password = base64.b64decode(auth_data[1]).decode('utf-8').split(':')
                    if username == 'cloudmailin' and password == 'password':
                        return view_func(request, *args, **kwargs)
        response = JsonResponse({'status': 'unauthorized'}, status=HTTPStatus.UNAUTHORIZED)
        response['WWW-Authenticate'] = 'Basic realm="CloudMailin"'
        return response
    return _wrapped_view_func
With this in place we can add a decorator to our webhook view and ensure that requests are checked for the basic auth username and password before processing the received email:
@csrf_exempt
@require_POST
@basic_auth_required
def cloudmailin_webhook(request):
    # Get the JSON data from the POST request
    data = json.loads(request.body)

    # Get the 'to' field from the 'envelope' dictionary
    to_email = data.get('envelope', {}).get('to')

    # Validate the 'to' address
    if to_email != 'postman@cloudmailin.net':
        return JsonResponse({'status': f"invalid to: {to_email}"}, status=HTTPStatus.UNPROCESSABLE_ENTITY)

    # Access specific fields from the JSON data
    subject = data.get('headers', {}).get('subject', 'No Subject')

    # Print the extracted fields to the console
    print(f"Subject: {subject}")

    return JsonResponse({'status': 'ok'})
Receiving Email Attachments with Django
CloudMailin makes receiving email attachments easy. There are two options for attachments:
You can either
- receive the attachments as part of the JSON data that is POSTed; Or
- upload the attachments directly to Cloud Storage such as AWS S3 and receive them as a URL
We're not going to show a full example here but instead just link to the
relevant documentation
HTTP POST Formats - JSON Attachments.
As with the parameters above it's simply a matter of taking either the
attachments[0].url or attachments[0].content and working with them.
For example for the Attachment Storage version we could get the URL of the first attachment like so:
# Access specific fields from the JSON data
subject = data.get('headers', {}).get('subject', 'No Subject')

# Get the URL of the first attachment
attachments = data.get('attachments', [])
first_attachment_url = attachments[0]['url'] if attachments else None

# Print the extracted fields to the console
print(f"Subject: {subject}")
print(f"First attachment URL: {first_attachment_url}")
Perfect, now when we make the request we'll see a 401 Unauthorized response unless we pass the correct username and password in the basic auth header.
That's all we need to do, obviously this can be extended to store details of the email in a database or perform more advanced processing in the background using a task queue.
We recommend if your request is going to take longer than a couple of seconds that you return a 2xx status code and then process the email in the background to keep things performant.
Once you've deployed your application to a public server you'll just need to configure CloudMailin to send email to your endpoint.
Summary
That's the code complete. All we now have to do is log into CloudMailin and make sure we
set your address to deliver to http://example.com/incoming_mail (replace example.com with your App URL) and send our first message.
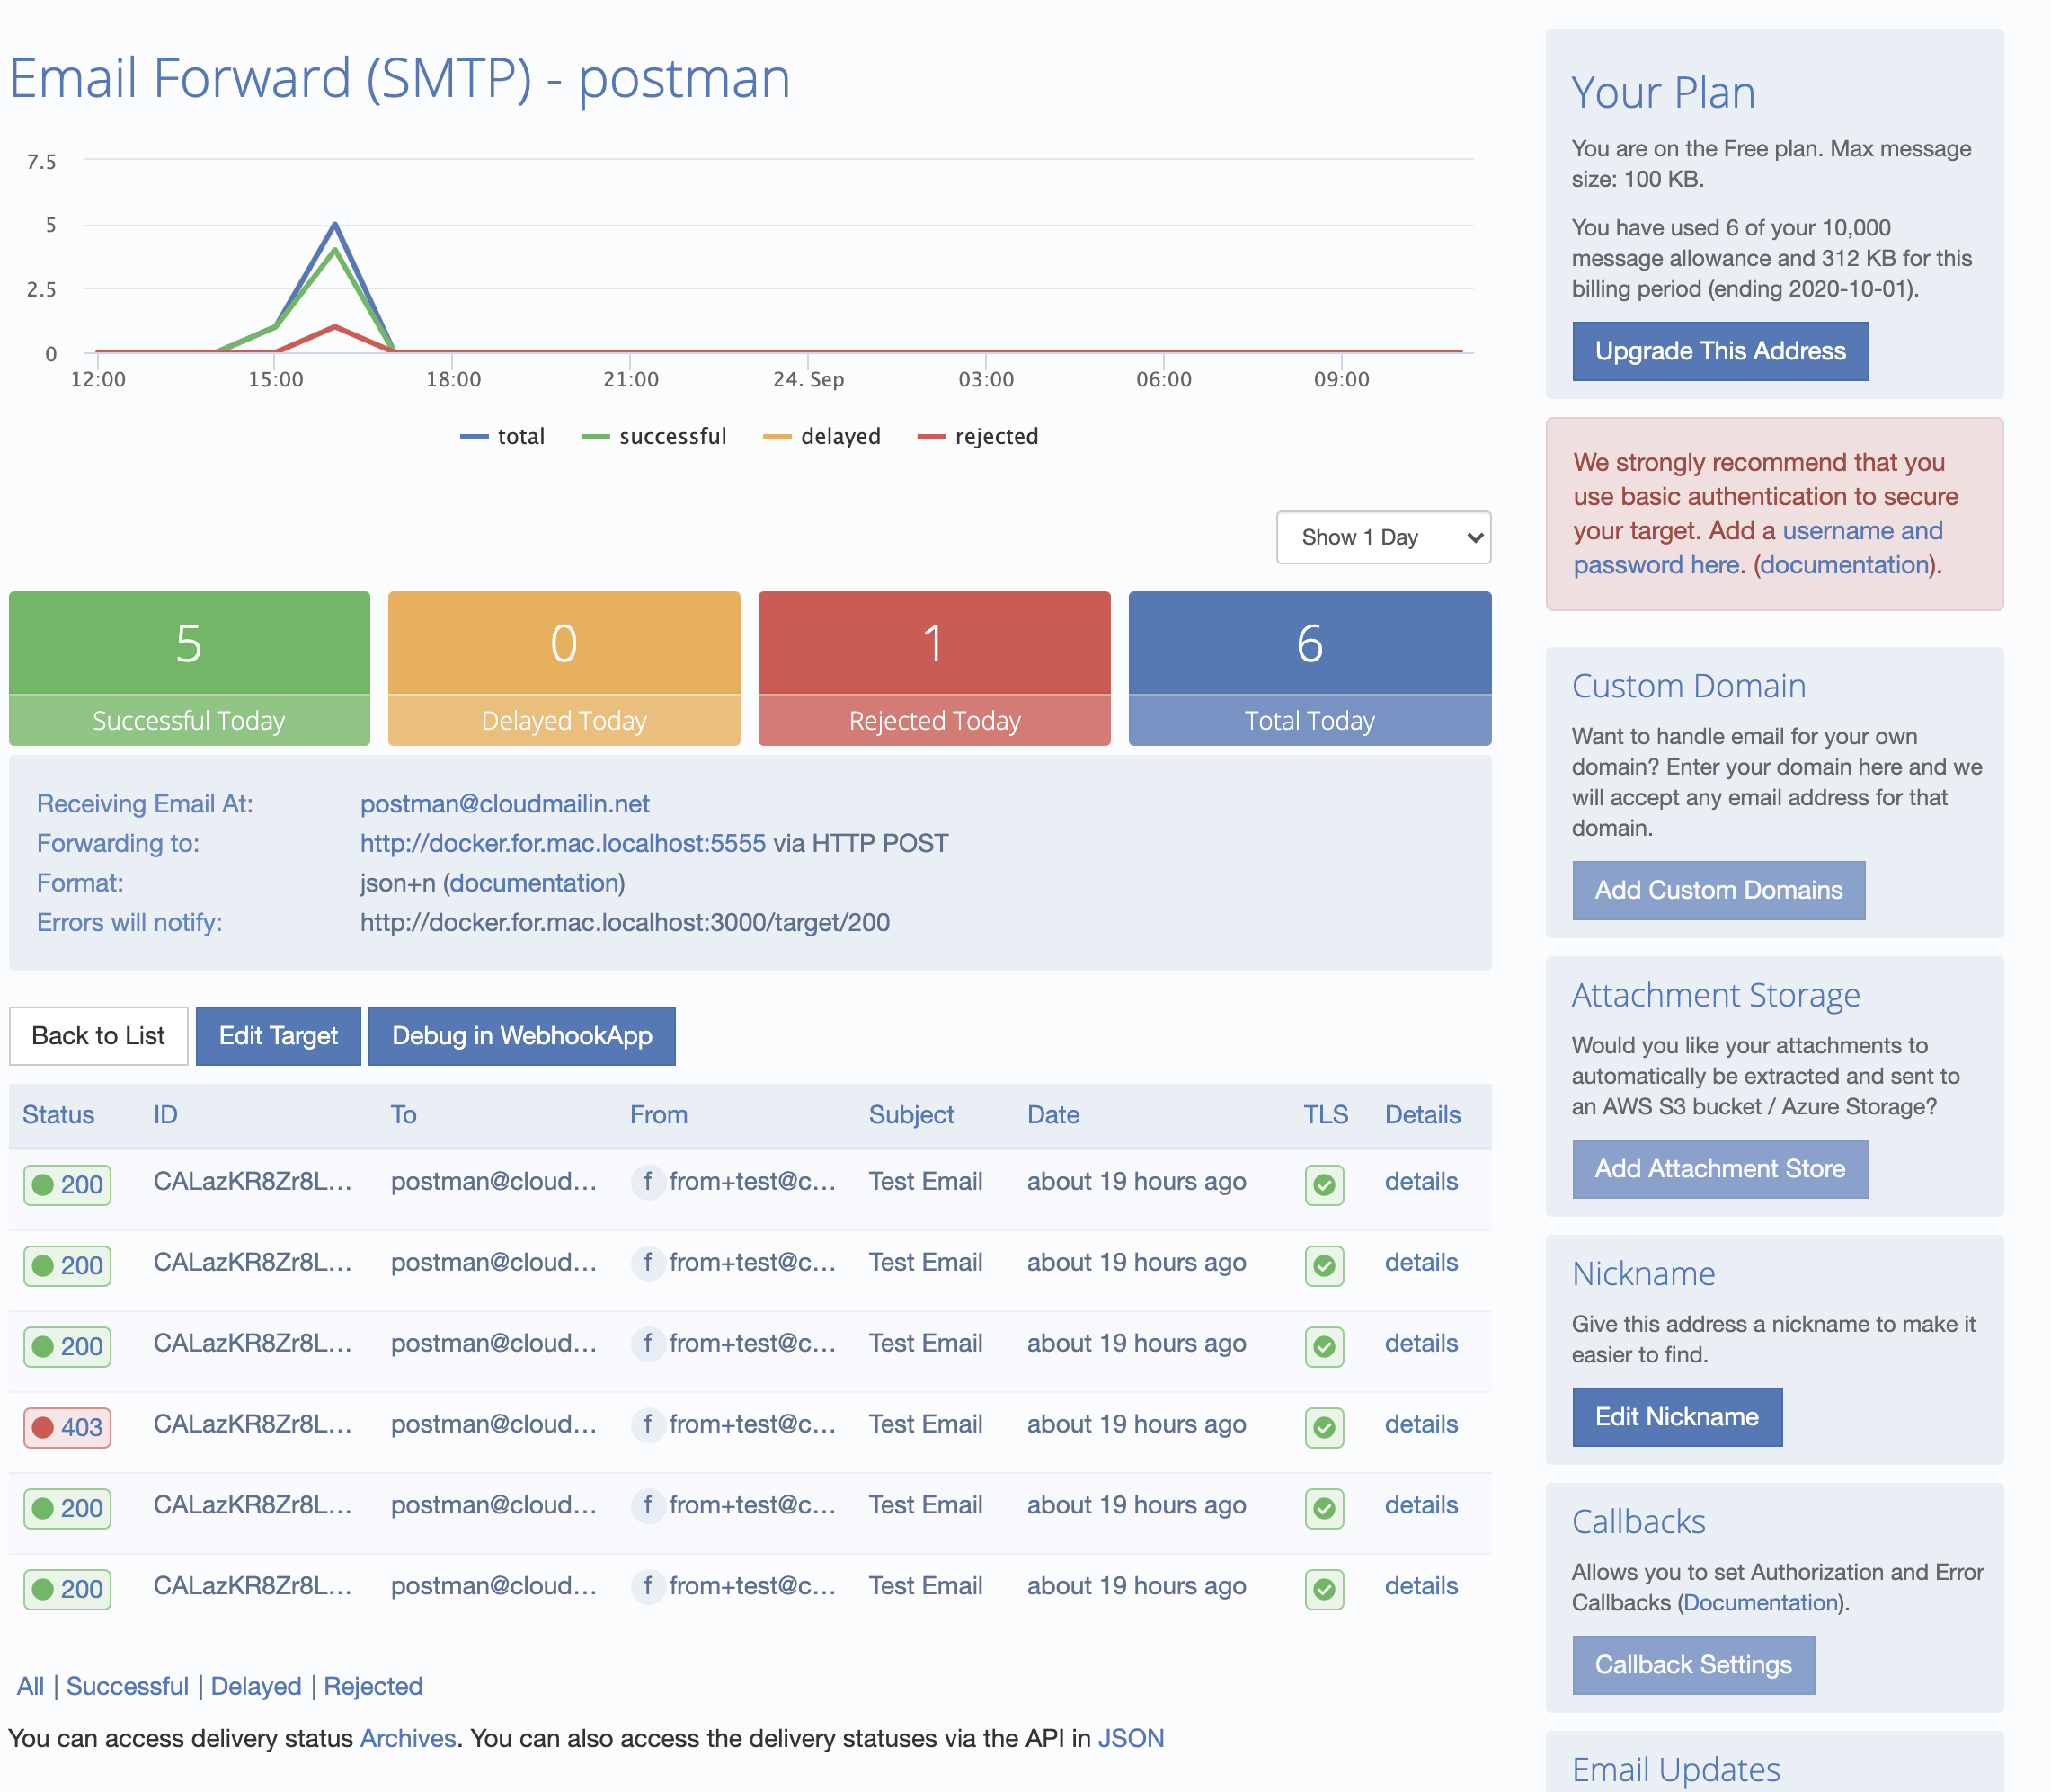
All of the details are listed in the dashboard. Here we can dig in and see the details. If the HTTP response of your server does not return a 2xx status code then the response will be recorded (see Status Codes):